Wood vs Water – Top 2 Installation Mistakes!
Concentrated water carved the Grand Canyon. It is the most powerful and relentless force on this planet. You either create a path for it or it creates a path for itself. If you are planning to use wood on the exterior of a building you should know that the greatest threat to your wood is the people installing it. Improper drainage control costs people thousands of dollars every year.
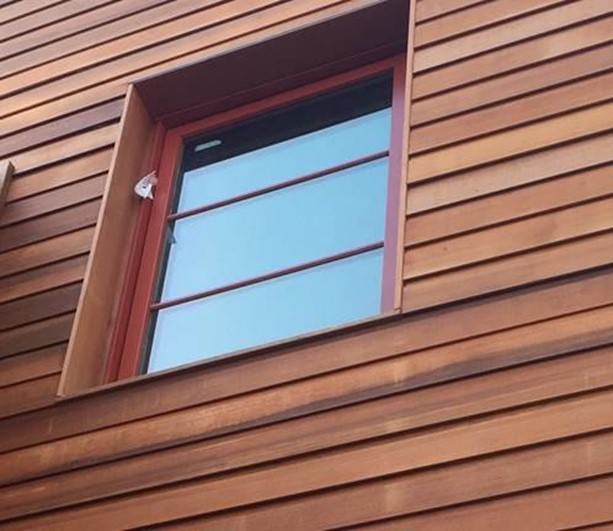
“Hi Chris! I’m loving my siding, however, getting some early water drip line marks throughout. What might you suggest I need to do? Add another coat of stain? Or? Thanks, Steve”
#1 DRIP CAPS
The single most expensive and frequently made mistake is not using drip caps. I sent Steve’s shots to a builder friend of mine who told me that it did not look like they installed a drip cap on the top piece of window trim. When rain hits the flat piece of trim that stands proud (thicker) than the siding above the window the water gets directed to either side and runs down the wall in concentrated volumes.
This was a perfect storm of events in that it rained shortly after he installed it and the concentrated water washed out some of the stain pigment. The customer thought it was a stain failure, but it is an installation mistake, no drip cap. A drip cap would have allowed water to shed right over the top of the window and continue its merry way without concentrating in any given area.
The stain is holding up just fine in places where the water has not concentrated. Wood stains and finishes are designed to hold up to “normal” wear and tear. Concentrated water is not “normal” (remember the Grand Canyon) and no stain company on the planet can honor your claim.
Often the problems caused by not using a drip cap do not reveal themselves until some expensive repair work needs to be done.
All the water that does not flow over will get behind your wood. Water behind wood equals ROT! ROT = $$$$$
You can see how this becomes a costly mistake by imagining what this customer will have to do in order to fix it. He would have to get up there and remove 1 course of siding (good luck with that), install the drip cap under the house wrap and then replace the siding. Don’t forget you have to mate the new with the existing somehow. I would not want that job or the bill. At this stage our customer would be better off just planning the window trim to be flush with the top, side and bottom edge. He should can’t that bottom edge slightly so water can run off. This would keep water from concentrating and putting an unreasonable load on his wood stain. You didn’t know, your builder didn’t know and now you are stuck footing the repair bill. Drip caps on all windows, doors and (if you are not going to use rain gutters) the rooflines.
#2 SPLASH BACK
That takes care of where water starts but what about where it ends up? http://inspectapedia.com/BestPractices/Siding_Splashback_Damage.php
The other expensive mistake we see people make is not accounting for splash back. When water cascades down the wall it has to land somewhere. When it impacts it splashes. We see it all the time with wood siding that runs all the way to the ground. Almost inevitably the bottom 18 inches or so turns brown/black and starts to look like crap (often within the first year). Given enough time it will even start to rot. This is because every time it rains water hits that bottom part twice, once on the way down and again when it splashes back. Water running down the wall is “normal”, water splashing back against that same wall is “concentrated”. Concentrated water will cause a finish problem. Does not matter if it is stain or paint.
We recommend keeping your wood at least 18 inches off the ground whenever possible. Stone Veneers work very well for this purpose, accenting your wood while protecting it from splash back.
When it’s not possible to keep your wood siding 18 inches above the ground it is better to have a clean landing area for water draining off of your home. It is not a good idea to put a planter box or mulch right up to your wood siding. This will be an incubator for mildew and problems down the road.
It would be much better to pour a 1 foot wide area of concrete in front of those planter boxes. This will allow the water a clean landing area and what splashes back against the siding will be clean at least. Still not optimal but way better than a mulch or dirt landing pad. If you do run your wood siding all the way to the ground we recommend walking the entire perimeter every year and addressing any issues you see right away.
Understanding splash back is one of those sneaky little details that cause BIG problems. These articles are born from the pain and anguish of people who call us and are written to assist wood owners in avoiding mistakes that take you away from enjoying your beautiful wood sided home.
The Truth as I know it. Chris Buffalo with Buffalo Lumber, McMinnville, TN – Telephone 877-960-9663.